Showing posts with label Card Spotlight. Show all posts

Friday, January 29, 2016

Creative Inspiration - Creative Card Fun


Okay.. so just a super quick post today as I am on placement once again and running after a room full of toddlers.

Have had a few cards to create this month so used some of the Pink Fresh Studio - Up in the Clouds paper range to get creative.

I had two cards to create... one for a wedding and one for my youngest daughters 7th birthday.
This paper range was perfect for create two cards with a very unique different feel to them. Both cards were created on a recycled card base as I love the look that it gives the cards.

Because of the whimsical feel to the paper range it was perfect for creating a birthday card for my youngest. I have matted a piece of the mixed patterned paper from the range on some of the pink card stock used to stabilise the embellishment kit (waste not want not I say!). My daughter is a mad keen fan of care bears, so I had to work an image of her new care bear, Grumpy, into the card some how. I have printed an image onto some Canson paper and hand coloured the image. The mounted in on the card using some 3D foam tape. The little wood veneer umbrella that was in the kit was a perfect accent for this card too to finish it off.

Now one of the patterned papers in the stash had a house image which I have cut out to add to this card. Being the card was for a wedding I thought it was fitting. I have them teamed together two different coloured mini paper doilies that I had in my stash that worked perfectly with the colours in this kit. Then it was just a case of layering the paper flowers in the kit on some bowed garden twine to give it a a more rustic fun feel.

As I said.. very quick post sharing two fun cards. 
Love being able to use up all the kit I receive by creating a few cards.

Well better get back to it.

Till I get to sharing the last layout from this paper range.

TFL,  M x


Saturday, November 21, 2015

Creative Inspiration - Cards Galore


Wow.... This month is just speeding by...

I am back to share with you some cards that I made for the mountain of birthdays that I had during October. It was certain the month of birthday craziness. 

My first card was for my daughter boyfriend, Adam.  Now I really am not a huge fan as you know of creating masculine cards. It's fine when it's for younger boys but as they get older I find it harder to give the cards a real masculine feel. However I found it quite easy this time with a bit of help from some garden twine, matching stickers, a wooden domino and a flair. 

Now as I said I find it easier to create for younger boys and this card was made especially for my son. I really wanted to add in the little mummy stamp so just created the card base and then added the mummy in as the embellishment on the front of the card. I love the little chalkboard flags too as they add that little extra with ease.

With my daughter's 18th birthday looming my Mum was going to buy a card when I sang out that I could create something for her to give. It was the perfect opportunity for me to be able to try out a technique I wanted to try. I really wanted to know if  stamping onto kraft card stock and then colouring with mepxy markers could give a good effect. I must say that I LOVE the look and plan of playing with this again.

Now... my younger children wanted to create a card for the big sister too so we all got together to create this card. I have used some of the matching stickers to create the embellishments and teamed it with a large black satin ribbon bow. We then finished the card off with some bling in the form of the glitter numbers.

The card I created especially for my daughters 18th from us I wanted to have a feminine feel without being too girly. By adding it the black and grunging up the card I have been able to achieve the look I was chasing. I have then layered some paper doilies and finished the card off with some garden twin and a wooden die cut dress form.

The last card I created was a super quick one for my niece. I played around with some gelatos on some water colour paper the create the base of this card. I have also double matted it onto some kraft and lightly hand stamped with a graph stamp and black staz on ink. The flowers I have created using layered stamped images and some dew drops. I then mounted the using 3D foam dots to add dimension.

Must say that my busy birthday month is over and I can now get working on Christmas.

Till next week I hope you all get a chance to get creative.

TFL, M x


Sunday, May 10, 2015

Extra special - Mother's Day Share


Afternoon everyone.
On behalf of everyone here at Mad About Scrappin,  I would like to wish 
all the Mums, Angel Mums, Grand Mums , To Be Mums 
and most of all of the the Angel Mums 
a very very 

I have a quick share for you today that I had mentioned on Friday. 
I have created a few extra special cards from some of the Echo Park Princess paper range for MOTHERS DAY !!!!

 So here's the cards I have created for Mother's Day.
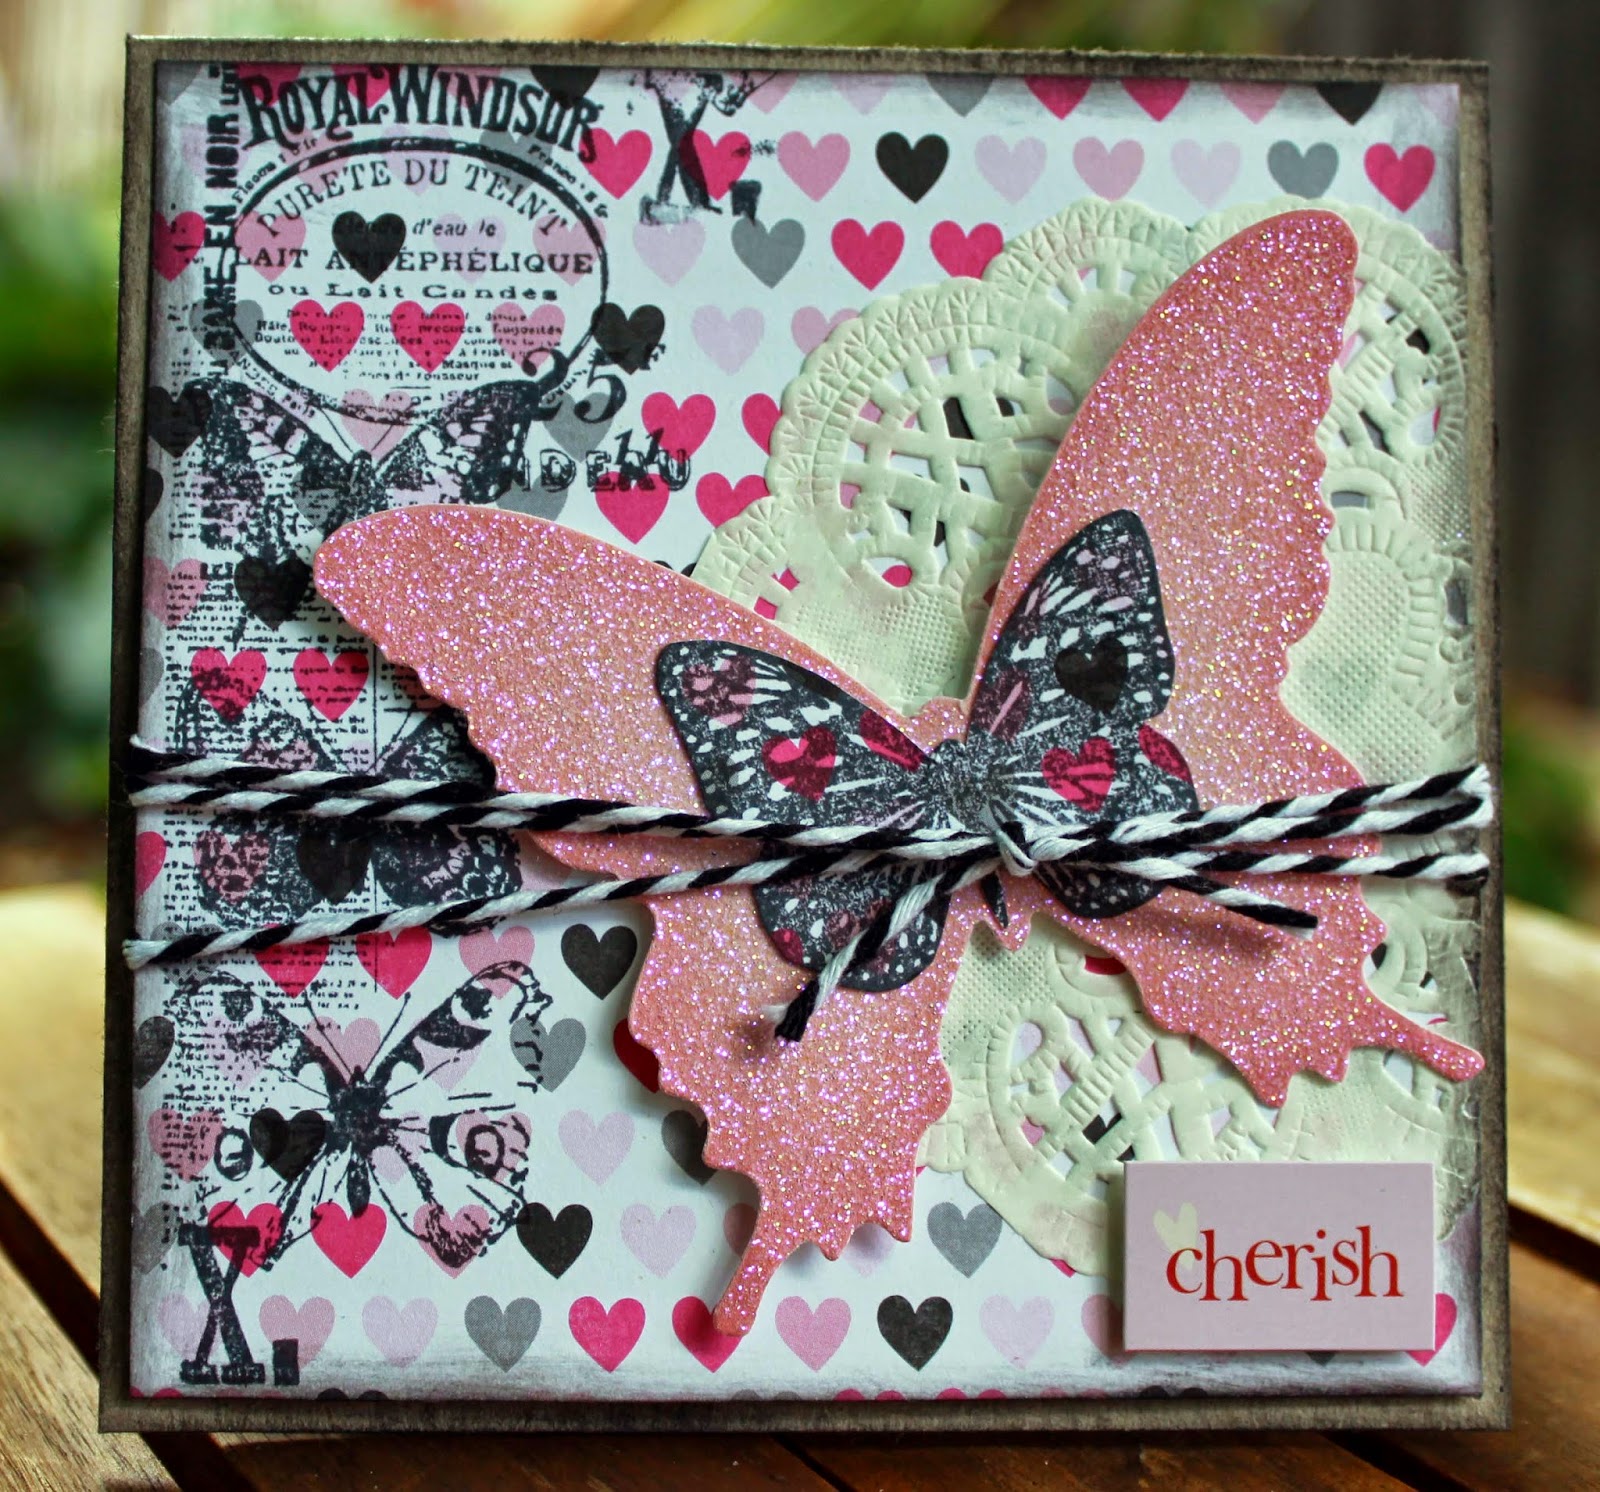
My first card I created on recycled card as a base. I have then used the heart pattern from the paper range and inked the edges before stamping to the left side of the paper vertically. I have also inked the edges of the recycled card base.

Then I have layered a medium sized paper doily and wrapped the card with some black and white bakers twine. I have then added a large glittered butterfly tucked under the twine. To finish if off I have stamped a smaller butterfly onto some of the heart paper and adhered it to the centre of the glittered butterfly and added in a sentiment from my stash. 

For the second card I have played around with some paper napkins that matched the paper range and have adhered them randomly in small pieces to a piece of white pasteboard. I have then matted it onto a light grey card stock and then to a black card base. 
To mix it up I have played around with a few of the mixed patterns from the paper range to cut out the hexagons and adhered them randomly across the card.

Then I have added some decoration to the card with a little help from a clock that I had in my stash that was on acetate and some organza ribbon. I then clustered a mix of paper flowers from Mad About Scrappin. I then finished it off with a sentiment sticker to add my greeting and a cute little metal filigree heart I had been sent to play with.

Both cards very feminine and  a little different.

Well better get back to relaxing for my Mother's Day.

Enjoy.

TFL, M x

Friday, May 8, 2015

Creative Inspiration - Week 19 2015

Hello everyone.

Just a quick share today as I am in the midst of birthday party prep madness here at the moment.

Have been crazily scrapping when I can 
and have been able to get into some more of the Princess paper range by Echo Park.

This week I have created quite a few cards for friends and family. I am sharing a few with you today and have a few extras to share with you on Sunday that I have created especially for Mother's Day.

For the first card I have used some recycled card to create the base of the card. I have then added a piece of white bird cage embossed card stock to begin creating some dimension. I have stuck to the subtle colours of this paper range too for this card and combined it with a paper doily and stamped bird cage. 

Then it was simply a case of clustering the paper flowers around the lace ribbon bow I have created on top of a larger floral ticket stub from Mad About Scrappin. 

For the next card I have used a white embossed card as my base. Layered some of the bolder heart print paper from the paper range with a script stamped doily. Then added in a cute grey striped paper bag  with a tag from Mad About Scrappin. Finally added a cute pink dotty tag I have had in my stash for ages that matched in well.


Then I have mixed it up with the embellishments a bit by mixing a larger fabric flower with a couple of smaller paper flowers to match the pinks in the paper. Then finished it off with a die cut butterfly from my stash.

For the last card I have started once again with a recycled card base. As I had a silver doily I wanted to play with I stuck to the black and white from this paper range. I have stamped roughly on one side of the patterned paper and inked the edges before adhering it. I then added the silver doily and some cute craft journal spot available at Mad About Scrappin too.

To embellish this card I have added a sheer ribbon and a smaller white satin ribbon which I have bowed to one side. I then added in a paper butterfly which I have blinged up. Finished with my greeting and it was super quick to finish.

Well better get back to finishing off costumes and party food. 

Till I share again on Sunday.

Enjoy.

TFL, M xxx


Friday, February 20, 2015

Creative Inspiration - Week 8 2015


Hello again.

I have had a very busy week this week. With getting used to new sports routines and changes to school classrooms  the kids and I have found it a bit of a juggle to get back on track. I know that we will get there but I can see that it will take a few weeks. 

With that in mind I am busily trying to get everything sorted and back into school mode around the house. 

And yes.. I am one of those crazy routine Mum's that thrive on a strict routine.. it keeps me sane.. especially when I am trying to keep track of four kids on my own..lol


Created a couple of cards this week as I am slowly coming to the end of this paper range. 

So here is this weeks share.
Two very quick cards created in a very busy week. Love how they turned out and glad that I was able to use up some more of this kit.

Kept the first card simple. I cut out the shapes from scraps of the paper kit and adhered them to a graph 4x6 journal card from my stash. I then wrapped the card in some red/blue and white twine. Then added a kraft journal spot I had grabbed at the last Mad About Scrappin sale (wishing now I had grabbed more as they are divine!!!!). I added the greeting using some acrylic alphas from my stash. Then I finished off the card with some star stickers from the matching sticker set and some clear dew drops from my stash. 

The second card was for my partner for Valentines Day. Wanted to create something just that little bit different. I stamped the kraft patterned paper then matted it onto some blue card stock as the card base. The added a strip of red striped paper that I had matted on some white card stock. With a journalling pen I added in some stitch lines then adhered a blue patterned paper circle I had adhered to  a large chipboard circle for depth. The people symbols I printed from the computer and then hand cut them out. I finished them off with some blue acrylic letters for the "x o". Finally finished off the card by creating a red bling heart made from the teenie sequins Leanne sent me to play with. Super cute and finished the card off perfectly. 

Well.. till next week.

TFL, M xxx

Friday, February 6, 2015

Creative Inspiration - Week 6 2015


Hello again.

So starts another month. With the start of a new month comes some new products to play with. As normal Leanne from Mad About Scrappin 
has surprised me with some amazing goodies to showcase. 

I was lucky this month to have this kit sent to me to play with...

Now for something just a little different I decided to start using this kit off with a bang. To explain a little .... recently my youngest daughter had her sixth birthday. Now as part of the party preparation I bought some paper party bags from Coles. 

As most of you know I just cant leave a party bag the way they come... I just HAD to personalise them. So I set to work collect all the bits and pieces I would need. I made little flags using some of the red and white striped paper in the kit. Then cut some tags from the kraft coloured paper. Once again I have played around with some digital stamps to create the 6 - celebrate cards. I printed these onto some graph 4x6 cards in my stash and jazzed them up with some matching washi tape. 

So here's the finished bags once I had assembled them all.

I had some old bingo cards in my stash that I decided to use as the base for all my decorations. I sanded the edges to tone them down just a little. I also finished the flags off with a gold glittered star to add that little bit of sparkle. Quite enjoyed jazzing these plain bags up and the kids just loved them.

Now.. as it was Miss Ts birthday I decided once I had finished the bags, that I would carry the theme over to her card. I cut up the base of the party bag to use as the background for this card.

To add a bit more dimension to the card I used a journal calendar spot from Mad About Scrappin. I finished off the spot using some mini alphas to add in the month and year of her 6th birthday.

Now to finish off the who card I wanted to add some sparkle. This was easily done with a bit of help from these super cute teenie sequins Leanne sent me. I just randomly applied adhesive the sprinkled the sequins and some iridescent glitter. Super easy and fun to make such a mess creating.


Had had a great time creating with this paper range. 

Cannot wait to share some other bits I have created over the next month.

Till then.... TFL, M x


Friday, January 16, 2015

Creative Inspiration - Week 3 2015


Welcome back again...

Hope that everyone is having a great new year so far.

Here I have been busy enjoying no early morning school runs, no racing through breakfasts, and best of all not having to get through every one's homework in the afternoons.

We have been enjoying the nice weather we have had and best of enjoying being able to spend some time together as a family.

I have to admit however in the build up to the holidays to having made sure that I was able to get quite a bit of scrapping sorted to be able to spend time relaxing for a bit with my family. So with that in mind I have been using up the very last parts of this paper range to create the last two cards I needed for this month.

So here are the last two cards I have created.
Both rather simple and straight forward really. Have kept it simple as they were both masculine cards. Most of the bits and pieces have been from the kit, however I have added in some odd pieces from my stash. 

For this one I have used the maroon patterned paper mounted onto some olive card stock. Then added a kraft paper envelope, a black and white journal card and some garden twine to twine it all together. Have finished off the card with a couple of wood veneers and then a quote from the matching stickers sheet to finish it all off.

For the last card I have worked with some more olive card stock to matt the maroon graph patterned paper from the range. Stamped some numerals on the graph as it is to be a birthday card. Mixed it up with a little washi tape and some mixed ephemera from my stash. Then finished it off with some stamped kraft photo corners and a matching quote stickers from the paper range.


Super quick and easy to make.. AND I got to use up all the scrap pieces from the kit.

Have you managed to get some scrapping done ?

Off to relax and enjoy some more family time.

Till next week.

TFL, M x


Friday, January 9, 2015

Creative Inspiration - Week 2 2015


Yes.. it's me.. 

Back again to share with you some super easy cards I have created using the scraps I have left over from this kit.

Will keep it quick this week as I am in the midst cleaning up after my youngest daughters sixth birthday party and dropping the kids to their Dads for a week.

It was been one hell of a busy week here that's for sure. 

Luckily I had planned and scrapped these in advance or it would never have happened. 

Anyways... here's the cards for this week.


I have used some recycled card bases to start with then mixed it up to create two very different birthday cards. One was for Ma Watt and one for my partner, Michael. 

The card for Ma Watt was a mix of tan toned papers from the range, a mini paper bag, a kraft tag, and a die cut doily. Then I added some colour pop with a ruby red flower from Mad About Scrappin, some ribbons and some flowers from my stash. I then finished it off with a butterfly from my stash and the greeting made up of a word sticker from the matching set.

The second masculine card for my partner I threw together very quickly. I find masculine cards a bit harder so kept it simple with a mix of ephemera from my stash, some washi tape, stamping, kraft photo corner and a few stickers from the matching set to finish it all off.

I find I always struggle with cards so find if I get in and get it done real quick I don't have time to doubt what I am doing. I also layer it all onto the base till I like how it all fit then adhere too.

Well.. off to tidy up my house and get it back to normal.

Till next week.

Get creative, M x