Wednesday, February 27, 2013

Getting a bit summery with Mad About Scrappin

Feeling very bright and summery at the moment with all the sunshine and warm weather here in Adelaide at the moment.
 
Mind you I must say it has been a welcome relief from all the warm weather to be able to hide away in my scrap room and play.
 
Once again I have been lucky to be able to put together another kit for you to play with  on behalf of Mad About Scrappin.
 
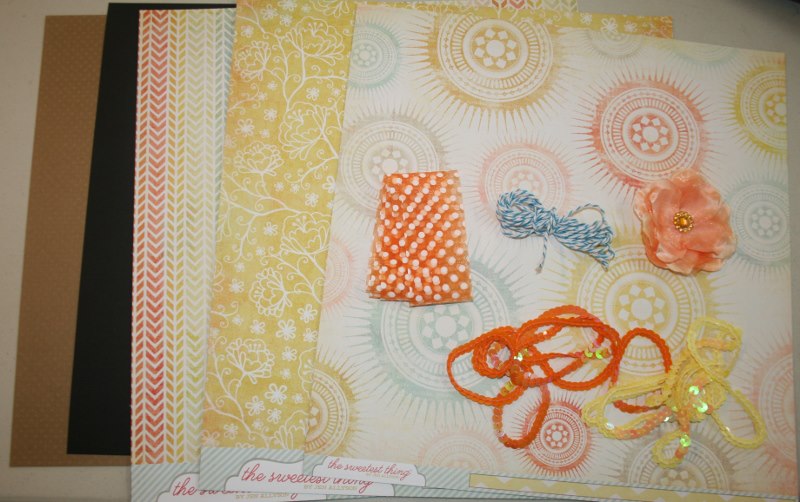
And YES.. once again it was hard to choose what to put in the kit. However going with the summery feel I chose some bright paper by My Mind's Eye to play with.
 
Now I am not really much of an orange and yellow person but these papers were crying out to be played with. Plus the fact I love to be able to challenge myself too to create something just that little bit different too.
 
So here's the kit I have created for you and was released at the Mad About Scrappin Flog It Friday Sale.


And these are the layouts and card that I created using the goodies from the kit.


Remember that you get the FULL instructions to be able to create the layouts yourself.
 
The kits are available exclusively to Mad About Scrappin.
 
Head over to the Mad About Scrappin to see what other goodies are in store.
 
Happy Scrapping, M x
 

Sunday, February 24, 2013

New Adventures with Mad About Scrappin

Wow... what a busy start to the year it has been here.
 
My scrap room is finally all settled and sorted. Now you know what that means... plenty of space now to scrap to my hearts content!
 
To top off a sorted scrap room I have been lucky to be able to put together a couple of kits for Mad About Scrappin.
Now.. it was extremely hard to choose exactly what I wanted to play with because there is so many goodies in the store I just HAD to have...lol.
 
So.. here's one of the kits I have put together for you this month...


Full of yummy My Mind's Eye paper AND I have created some fun flowers for you.
 
The kit comes with FULL instructions for you to be able to create these layouts and card for yourself.
 
YES... I even give you the instructions on how to create these super easy and fun flowers too !!!!
 
Here's the layouts and card you could make yourself.


But you had better be quick because there is limited kits left.
 
Get scrapping and head over to the Mad About Scrapping shop.
 
TFL, M x

Thursday, February 14, 2013

Making a mess but having fun

Hello Everyone.
 
Michelle here from Adelaide, South Australia.
 
I am super excited to have been invited back to play along with you all at Mad about Scrappin.
 
I have been having a bit of fun this month so far mixing it up with this months challenge.

I think when I see the word challenge my eyes light up and my brain seems to tick over.
so for this month's challenge I got to work creating a layout of my eldest daughter.
 
Now.. I have just recently moved house and am slowly getting rid of piles of packaging and cardboard from new furniture I have bought. Bearing that in mind I have some of the packaging to be of use for future scrap booking projects... that is much to my children's disgust. "More cardboard packaging to find a storage place for!" they said. lol
 
So for my technique as part of this month challenge I have recycled some of the cardboard packaging as my base for my layout. To the base I wanted to add some texture and have managed to do this using a few layers of paper napkins adhered directly to the cardboard base with a glue wash. The key is to use a paint brush to apply the glue wash, be gentle and not worry about wrinkles as they really do add to the effect!  Plus the best bit is that because the recycled card was quite thick it was able to work well with the glue wash and napkins without warping when it dried.
 
After the base had dried I then applied a wash of watered down paint and then got busy with multiple colours of glimmer mist to suit the paper I had chosen to use. The glimmer mist helped to highlight the scrunched napkins. Plus the glimmer mists also gives the base of the layout a slight shimmer when the light hits it.

 
The last technique I have used is hand cutting. I actually find hand cutting quite relaxing..
Nuts I know!
Because I was in the recycling mood AND because I just couldn't find the right flourish that I light I decided to mix up a few of my wooden flourishes and trace off the bits I liked onto recycled card till I had a flourish I was happy with. I then used my craft knife to remove the excess card stock and then coloured it with glimmer mist till I was happy with the colour.
 Super easy and at least I got the exact flourish I wanted.
 
 
Super happy with the end result. I got to recycled some of my packaging AND got to get messy creating in the process.
 
 
Why not play around with the challenge this month and see what you can create.
 
TFL, M x


Monday, February 11, 2013

Challenging myself

Hello again.
 
I am back to share with you a layout using some goodies I was lucky enough to be able to play with on behalf of Helmar and 7 Dots Studio.
 
Now... to share a little secret with you all about me.. very rarely do I use a full sheet of patterned paper as a background for my layouts.. Yes.. I am a little frugal when it comes to patterned paper. I find it very difficult to use a whole sheet of patterned paper for a background.
 
However just for something a little different AND because I have realised after just having moved house recently just how much paper I ACTUALLY have, I thought I would challenge myself a little.
 
So with that in mind I set to work using the "Hopefully" paper range by 7 Dots Studio. The hardest part I had on starting was actually deciding which side of the paper to use !
 
Using my Helmar Adhesive Tape Runner to adhere the larger pieces together certainly made my job just that little bit easier. Plus the fact that it was held in place nicely for me to be able to add a hand stitched border without the worry that the page would fall apart as I was stitching.


The rest of the layout came together easy with the help of some Helmar 450 and Helmar Liquid Scrap Dots. Both products are a match made in heaven for the fiddly bit you want to add to your layout such as twine and small strips of paper.
 
Must say that it was super easy to create dimension on the flags with a little help from Helmar 450 and a paint brush... I folded the centre of the flag over the fatter part of a paint brush to curve it. added a dab of Helmar 450 to the ends only of the flag and secured them to the page where I wanted them. Once I could see that the flag had been secured I removed the paint brush. The end result is that the flag looks like it is flapping in the breeze.

 
The only issue I had when creating this layout was that I had run out of dimensional magic to put on my title. Well... I solved that problem quickly by adding a thin layer of Helmar Gemstone Adhesive to my title with a paint brush. It dries clear and has left the title with a nice glossy accent. Super easy and a great alternate use for such a great product.
 
Products Used:
 
Why not challenge yourself today to play around with products you wouldn't normally use.
 
Happy Scrapping,
 
M x