Showing posts with label Design Team. Show all posts

Wednesday, January 27, 2016

Creative Inspiration - A fun whimsical feel


Hello again.

Back to share with you all a quick layout I have created using some more of the super fun paper range by Pink Fresh Studio called Up in the Clouds sent to me by the lovely Leanne at Mad About Scrappin.

This time around I have created  a layout using Kraft card stock as the base which I have then matted onto some vanilla coloured card stock. 
I have kept this layout super simple and have focused on the fun whimsical feel of the paper range this time around. I love the patterned paper in this range. It looks like it has been hand drawn and the colours are just so fun. I have teamed this up with some aqua card stock and grey striped washi tape. I have used two similar photos for this layout but have used a cream dotted black frame from my stash to frame off one of the layout. I added a paper strip to the frame and covered a chipboard die cut bird in the matching paper to add some fun to the layout.

To fill in the open Kraft card stock base I have punched a few hearts out of the patterned paper. I then added a few matching yellow die cut chipboard stars to finish off the hearts and add some dimension.

To finish off the layout I have added a couple of flairs from the kit to create my title and added feature to the layout. They match perfectly and add that little bit of dimension just where I wanted it.

I had fun playing around with this super easy layout.

Till next time.

Get creative.

TFL, M x

Tuesday, January 26, 2016

Creative Inspiration - Bold background

My oh My !! 

I have been a naughty blogger. I have had the posts all ready for this month and have been so busy that I actually forgot to post them!

Things have been crazy here with being back at placement, a wedding to attend and school holidays. Time for  me has been absolutely crazy and full of chores and other catch up jobs.

Anyways.... I have a new kit to share with you all. I have been sent this super fun paper range by Pink Fresh Studio called Up in the Clouds.

So this is the first layout layout I have created to share with you.
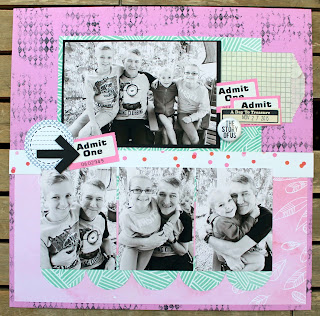
I have gone quite bold with the background for this layout by using some lolly pink card stock which I stamped with black as the base. I did this because I really liked the mix of aqua and pink in this paper range but wanted to tie them to the base layout with some black and white. I decided to use black and white photo so that the paper range could be the hero for this layout.

I have matted my larger photo on some black card stock as it seemed to get lost on the colored paper. Then clustered a mini paper bag with some pink ticket stubs with a flair from my stash. 

I then finished off the layout with another ticket stub and chipboard arrow clustered on the other side of the larger photo on top of the journal spot from the kit. I haven't added a title to this layout as the flair said it all for me. 

I was quite excited too that I challenged myself to use so many photos on a layout. Not something that I would normally do but had heaps of fun trying to get them all to work.

Well better get back to it. Cannot wait to share with you all the rest of the layouts I have created from this kit.

Till then.

TFL, M x 


Friday, December 25, 2015

Creative Inspiration - Christmas Greetings to all

On behalf of Mad About Scrappin I would like to wish everyone a super special Christmas.

I hope that everyone has the opportunity to rest and relax even if it is just for a little while on this mad and crazy day of the year.

I know that I am feeling grateful to be able to share this special day with my children and parents this year. I am looking forward to seeing the smiles on my children's faces and will be soaking up the family time together.

I have a layout to share with you all today using some more of the Summer Vibes paper range by Simple Stories.

Now who says that you have to use Christmas paper to create a Christmas layout.... certainly not me!

Here's the fun layout I have created using a photo from Christmas 2014.
I have used a cream card stock as the base for this layout which I have stamped using a graph stamp randomly to add some detail in the background. I have also used a paper doily from my stash made from kraft paper. I have had it for ages and just haven't had a chance to play with them.

for the larger circles on the page I have adhered the soda pop lid print to some medium sized die cut chipboard circle to add some depth to the layout. I have then stamped a circle journal stamp to create a bit of interest behind the stamp and set the chipboard circle so the some of the stamped journal spot shows. I have then used some of the scraps of the mixed patterns in the range to create some Christmas baubles which I have added bakers twine bows to. It's a little hard to see but there even is a little bit of hand stitching on the layout to add a bit of detail here and there.

Finally I have added a kraft journal spot with the date the photo was taken and a flair to add a bit more dimension to the page. I have also stamped some matching Christmas trees onto the matching paper and hand cut then. These I then mounted using 3D foam dots. 

I quite like the feel of this Christmas themed layout created from paper that IS NOT Christmas themed. Why not think out the box every now and then.

Well hope that everyone enjoys the festivities.

Till next time.

TFL, M x

Tuesday, December 8, 2015

Creative Inspiration - Pocket letter fun


Well... the weekend just flew by.. this time of the year is absolutely crazy and no matter how much I say that I will stay on top of things things it just doesn't seem to happen. 

Anyways... I have been playing with some more of the Summer Vibes paper range by Simple Stories.

I have had to wait a little bit longer than I had hoped to be able to share as I had created this pocket letter using some of the paper for a swap. The pocket letter has arrived safe and sound at it's destination in New Zealand so I am able to share now.
The pocket letter was for a summer themed swap. I was at a bit of a loss as to how to take this theme at first. Then the kit arrived and I knew that it was perfect for this. I was going to do my usual and decorate each little pocket however I had this idea of creating a picture divided into each of the pockets. I also know that I wanted to create a sun to signify summer. So with that in mind I cut five of one pattern (hello paper) and and four of the matching paper (aqua floral). 

The fun part came when I created the sun rays. To make it easier I used some re positional tape and adhered the pocket page to my mat leaving 2mm spacing to allow for cutting. I then layered the mellow yellow card stock rays and some matching washi till I was happy. I added the centre of the sun last to cover where the sun rays overlapped in the bottom left. To add a bit of sparkle I glitzed it up with some gold sequins from my stash.

To continue with the summer theme I added a title using some medium sized alpha stickers and some old beach themed stickers mounted on 3D foam to add some depth to the pocket letter. Super fun and easy to do too. I added all the goodies to go with the pocket letter into little bags and put them on the back of the pocket letter so that they didn't take away from the sun I had created. 

Lastly I have also managed to create a quick belated birthday card.  
Once again I have had a male birthday card to create. I always seem to put these off as I always seem to struggle pulling it all together to give them a masculine feel. I have used some kraft card stock as the base for the card. I have then matted some of the camera patterned paper from the Summer Vibes paper range onto some black card stock. 

Then it was simply a case of adding some embellishments to finish it all off. I have added a mini silver dot paper bag as the base for embellishments and then layered a mix of washi tape, die cut arrow border and a hash tag die cut which I then finished off with some garden twine. I then added my greeting and the card was all done.

Well... hope that everyone has a super week.

Better get back to sorting out some more goodies to share.

TFL, M x

Saturday, November 28, 2015

Creative Inspiration - Summer Fun Kit


Good afternoon all.

I have been having fun over the past few days working with a new kit that the lovely Leanne has sent me to play with.  It included some of the awesome paper range by Simple Stories - Summer Vibes.
I must say that when I saw this kit I was just a tad excited to be able to play around with it. It is perfect for scrapping this time of the year and I cannot wait to share with you all what I have got planned to use up this kit.

So today I am sharing with you a layout that I have created using one of the 12x12 sheets as the base for the layout... 
I have trimmed the paper just a little to matt it onto some kraft card stock as I felt that I wanted to add some kraft feel to the layout. Plus I quite like adding a little bit of a border to the layout when I am using pattern paper for the base of a layout as I feel it breaks it up a little. 

As you can see to the paper range really does have a real summery vibe to it. I love the mix of the slightly muted bold colours on the wood grain base.

I have also used some wood die cut Polaroid photo frames to showcase the photos on this layout. I printed my photos off as black and white so that they matched well with the papers in the range. 

I added in some journal cards that matched perfectly with their distressed heart pattern colours to the colours in the paper range. The little kraft journal card also helped tie the kraft base to the layout too. I have also hand stitched the layout to add a bit of detail to the layout.

I have  also played around with a mix of washi tapes from my stash which match the paper range to follow the patterned theme on the printed paper base. 

This was such a fun paper range to play with and certainly has a fun summery feel to it. I cannot wait to share with you all the other goodies I have been creating with it.

Till then... I hope that you all get a chance to get creative.

TFL, M x

Friday, November 6, 2015

Creative Inspiration - Playing with glitter

Good morning all.

I am back this week once again to share with you all three layout that I haven't had a chance to share yet that I created using these super yummy goodies sent to me by 
the lovely Leanne, from Mad About Scrappin.
I have been able to create 3 layout using all these plus a few extras from own stash.

My first layout I have created using a piece of black card stock as the base for the layout from my own stash. I have cut away the centre of the black card stock base to use some to matt the larger photo in this layout. I have then used matt white card stock as a base then cut some of the patterned paper to break up the white matt card stock. I love the mix of aqua and this peachy colour. I think that they work really well together with the gold accents that I have added to the layout. I must say too that I love the little handmade Polaroid die cut that was in the kit too. It is super cute with the gold and aqua accents which have been finished off with some hand stitching detail. 

For the second layout I have worked with the gold glitter heart accented paper as the base for this layout. Now as you know I don't usually like to work with patterned paper as the base for a layout. However for this layout I really didn't want to cut the gold heart paper any smaller and loose all the glitter hearts. So I have then worked with the side of the heart paper that had the most hearts and then teamed it with some of the matching papers in strips to break it all up a little. I have also printed my own journal card to match using a digital stamp on a graph journal card. I have to say too I love how the aqua colour of the patterned paper worked perfectly with the photo I had chosen. 

For the last layout I have once again worked with some black cardstock from my own stash to team up with the black dotted white white paper in the kit. I have then worked with some more of the aqua and accented the page with some printed ticket stubs and hand stitching in matching peach floss. The layout was then finished off with a bit of bling, flairs created to match the paper range and a super cute wood veneer camera.

I quite enjoyed working with this paper range. I love the glittered accents that were in this kit. Not something I would normally play with but loved the challenge.

Well back to get some scrapping done.

Hope you all get a chance to get creative this weekend.

Till next week.

TFL, M x


Sunday, November 1, 2015

Creative Inspiration - Using up the scraps


Hello all.

I hope that everyone has had a great weekend. 

Here my weekend has been extremely busy with being in the middle of placement and having two children's birthday in the part week. To top it all off I have had my eldest daughter's 18th birthday party!!! Yes.... WOW!!! still hard to believe that she is 18 years old!!!!

Anyways.. now that the house and yard are finally back to some sort f normality I have finally had a chance to sit down and get some blogging sorted.

So... I have a quick share with you this evening showcasing an old layout I haven't shared yet which I have created using the last scraps from Prima Coffee Break Pattern Paper Range by Pebbles that Leanne from Mad About Scrappin sent me to play with.

So here's the layout I have created to share.

I had quite a lot of fun playing around with the scraps to create this layout. It was also fun to play with multiple photos for this layout. However I have kept them to 3'x3' in size so that they haven't taken over the whole layout. 

As I was using up the scraps of the paper range I really didn't have a lot of paper to play with. Because of this I had decided to create something a little different. I have divided the centre part of the layout into sections and decorate each section a little different. This all came about because I had a couple of mini paper bags that I had been sent play with which I wanted to be a feature on this layout. I have been able to use them as the base for two of the six section on this layout.


I have played around and added some matching washi to the mini paper bags and then tied all the sections together with a bit of hand stitching in matching coloured floss. The whole layout ended up with a little bit of a different feel with a mix of embellishments used. I then have finished off the layout using some flairs and some large matching buttons to add a bit of dimension 

Just something a little bit different to use up the bits of scraps that I just couldn't part with.

Well.... back to get ready for another fun filled busy week.

Hope you enjoyed this weeks share.

Till next week.

TFL, M x


Friday, August 7, 2015

Creative Inspiration - Week 31 2015


With the weather here in Adelaide being miserable lately I think that it carries over to feeling like hiding away next to the warmth of the heater.

I have had a chance to play around with a few more bit and pieces from this paper range by Crate Paper - Open Book.

This week I have created a fun layout using a mix of papers from the range.
Now it's not often I get photos to scrap of my eldest daughter... she usually hides from the camera.  I found this photo when I was sorting through a stash of photos I had printed a while ago. The colours in the photo worked really well with the papers in this range.

I have a bucket load of really old alpha rub ons that are really not in the best shape. I really didn't want to just chuck them out as I know that would just be a waste of money so have decided to use them up where-ever I could. I have used up a few mixed alphas on the base of this layout to mix it up a little. I didn't want to go with just the girlie floral feel of the papers in the range. 

I have also hand stitched on some of the punched circles and the photo mat to add a bit of texture to the layout. I quite enjoy stitching on layouts and it is a quick way to add a bit of detail to a layout.

I have then added in a few features by using a journal spot, date spot and "today" tab in bold pink to added a bit of a different feel to the layout. It has helped to create the cross between a floral girlie look to the brighter bolder look. 

Quite a simple layout but I have used up some more rub ons that that have been taking up space in my scrap area.

Well... back to get some scrapping done.

TFL, M x


Friday, July 17, 2015

Creative Inspiration - Week 27 2015


Hello everyone.

Yes.. I know that my posts on the blog have been a little quiet over the past few weeks. 

Unfortunately life has gotten in the way of my craft time and really just haven't had a chance to scrap at all. Quite sad really as I did miss scrapping.

Anyways... I did manage to get some scrapping done yesterday.. I was suppose to be studying and getting my last gap assignment done but took time out to get a pocket letter done that I owe and then I kinda ended up making three! 

Now... I have been playing with the scraps from a kit set to me by Leanne at Mad About Scrappin. It has this super yummy and cute paper range Tangerine Adventures MME Jubilee.

I promise this week to show you the layouts that have been created to go with this kit which comes with FULL instructions on how to create the layouts!!!

So here's two of the pocket letters that I created with this paper range.


 For both of the pocket letters I have used the paper range as the base for each pocket. Then it was a case of finding pits and pieces to add a bit of pop to each pocket. I have used a mix of bits and pieces from my stash along with some added goodies from several Mad About Scrappin sales. 

I find that the mini paper bags from Mad About Scrappin provide super quick and easy pockets for the design. I am then able to hide little goodies in them. My favourite would be the kraft paper bags with the coloured letters. 

The other thing I have found with pocket letters is that they are a great way to use up the scraps of a kit. The paper is cut to 2.5' x 3.5' in size so finding scraps to fit is easy. Especially when you mix up the pocket colours from a matching range.

Well better get back to study so that I can play catch up on scrapping next week.

Till then.

Happy Scrappin, M x

Friday, June 5, 2015

Creative Inspiration - Week 23 2015

Good Morning..

Today I am sharing with you  a layout that I have created using this bright and bold paper range by MME - Wild Berry.

I was very lucky to be sent this paper to play with in this months kit. I couldn't wait to get into it as the colours really just pop out at you.

Here's this weeks layout in full.
Okay.. I have to admit that at first I may have felt a little intimidated by the bold large print of some of the paper range. However once I got cutting it up and mixing it around I found that it really worked well. I have also managed to use up some old tags from my stash that worked well for this. 

I really have layered up the mixed patterns in this layout. They all work so well together. I found some cute arrow tag stickers in my stash too that matched perfectly to add a bit of feature here and there to the layout too. Then tied the date to the page by framing it with a black mini Polaroid frame. super cute to play with. 

You can see the cute bird on a wire washi tape just peeking through there too that I was sent to play with too. I just love it and the colours of the birds work perfectly with this paper range. Helps too to create the whimsical look I wanted to record my daughters crazy birthday party fun. 

Quiet a fun layout to create using some fun paper.

looking forward to sharing more from this paper range.

Get creative. 

TFL, M x