Showing posts with label Dew Drops. Show all posts

Tuesday, December 18, 2012

Just because.. Spider fun

Hello all.

Once again I have been busy on the card making front. This past month and upcoming month bring lots of birthdays. However.. every now and again I like to be able to create a card to send to someone special just because. We all live very busy lives and sometimes we don't tell those that mean a lot to us that we are thinking of them.

Over the past few months I have been very lucky to get to know a very special boy. I had found some goodies while at the shops the other day with him in mind. Now.. I didn't want to send the goodies without popping a little card just to let him know I was thinking about him.

So with all this in mind I got creative with some goodies from The Robin's Nest.


Now the Hot Flame paper range was perfect to create a card with a masculine theme.


Products Used -
Garden Twine
Metal Spider Web Embellishment

Why not get creative and send a card to someone just to let them know that you are thinking of them.

TFL, Mx

Tuesday, December 4, 2012

Last minute Christmas fun

Hello all.
Back again to share with you my last Christmas card I have made for the year.
Still in love with creating themed cards using non traditionally themed paper and this years Christmas cards have been no exception.
With that in mind I have been playing around with some super yummy paper from The Robin's Nest again.
The best bit about the paper's that I chose to create this last Christmas card is that the already have plenty of sparkle to them.
I love the white glitter swirl paper from The Robin's Nest too. The main reason for me liking it it sbecause it is so easy to change the look of the paper by rubbing it with a little ink on a distressor pad. It highlights the glitter pattern and really creates a bit of dimension to the paper so easily.

Super easy card to create using of few scraps of one of my favourite paper ranges from The Robin's Nest to create the tree.
Products used -
Head over to the store and check out all the products The Robin's Nest has to offer.
TFL, M x

Tuesday, November 20, 2012

Playing around

Good Morning all.
 
Back again to share just a little bit of scrapping fun I have been busily creating with a little help from some products from The Robin's Nest.
 
I am so in love with the quality and versatility of these products. i have been able to create many pieces of work using these products as they suit so many different themes.

This year we went away to the beach for Easter. I had a ball playing around with the camera while we were away. Having a look back on them recently while I was looking for photos to play around with I found that the colours of quite a few photos really suited some of The Robin's Nest paper range.

I liked the fact that the paper range really help make the photo the feature of the layout. I was able to mute the paper down with a bit of stamping and inking quite easily. This also helped to create a bit of depth to the layout.
 
I must say however the most fun on the layout I had was with the teal flower. Because they are created from a heavy tissue like material they were really crying out to be scrunched, misted with gesso and then given a light mist of glimmer mist to age it a little. In the end the flower held its shape quite nicely. I am most impressed with the flowers.

 
Products used -
 
Why not check out the store for yourself and see all the fun products on offer.
 
TFL, M x

Tuesday, November 6, 2012

All that sparkles

Hello all.
Wow.. what a start to the month it has been.
With The Robin's Nest and Helmar blog hop things certainly have been very craft inspired that is for sure.


With that in mind I have been busy with birthday cards again. Seems that this month is just as busy with birthdays for friends and family.
This time around it was very close friends birthday that I have been busy creating for. So with a little help from some products from The Robin's Nest I was able to create a very elegant birthday card.

I also played around with some flourish stamps to created my stamped flourish on some recycled card. Then used the same flourish stamp to highlight parts of the heart. Just because your patterned paper is already patterned doesn't mean that you cant mix it up a little to tie it into your design.

  
The Robin's Nest products used :
I had a lot of fun playing around with this card and it was super easy and quick to create thanks to products from The Robin's Nest.

Why not check out what they have in store.
Happy Crafting, M x

Tuesday, October 16, 2012

A little bit of sparkle

Hello all.

Well this month proves to be a busy month in our household on the birthday front.

Two of my children celebrate their birthdays this month along with 5 other people in our family.

So bearing that in mind I have gotten in super early this year with my card preparations.

However this year has been super easy with all the yummy goodies that came in my Robin's Nest Design Team pack.

This time around I have played around with the following goodies


Viva la France Stickers

So using all these goodies I set to work creating a sparkly girlie card for my nieces birthday at the end of this month.

Certainly didn't take long to create and love the end result with the glittered cardstock.

Why not have a play around with some products from The Robin's Nest today.

TFL, M x

Wednesday, October 3, 2012

Creating with a masucline theme

Hello all, Michelle here to share what I have been up to lately on behalf of The Robin's Nest.

I was lucky enough to be sent some of the new Flame range to play with.

At first I must admit I wasn't too sure how I was going to play around with it.

Here's the products that I played around with this time around.


I had been creating a lot of very feminine layouts at the time and creating a more masculine layout using this paper range seemed in order.

So with that in mind I got messy again. I played around once again with some recycled card, Helmar Acid Free Glue and some patterned paper napkins to create the base of my layout. I then got a bit crazy with gesso spray and glimmer mists to lightly mist and glimmer up the base.

I then created a decorative stitched border to the layout using invisible thread ad seed beads which i hand stitched.. yes I know a little crazy but I love the end effect so the effort was justified I think.

Then it was just a case of inking and layers The Robin's Nest patterned papers till I was happy with them.
I also hand cut the flame from Flame Border patterned paper and adhered over the photo. I added some dimensional adhesive to the flames to give them just that little extra gloss and dimension.

So here is the layout I created

The photo part of the layout also lifts to allow for journalling underneath.

I must say that I am now loving the Flame paper range since I have started to play with it. I cannot wait to be able to play around with this again.

Dont' forget to head over to The Robin's Nest Blog to see what everyone has been busy creating!

Happy creating, M x


Wednesday, September 19, 2012

Creating with a bit of texture

Hello again, Michelle here back to share what I have been playing with lately from

Have had a pile of recycled card here that has been perfect for textured paste.
That is because when I play with texture paste it tends to be a very messy thick process. 

 So after creating a base from many layers of texture paste, gesso spray and numerous glimmer mists I was finally able to get creating with some yummy products from The Robin's Nest.

I must say I majorly in love with dew drops still. They tend to be a feature in all my layout lately.

So... Here's the products I played with this time around.


Now using all these goodies made it super easy to create this layout. The papers and background  have so much texture that I kept the layout rather simple. Plus the fact I really like how the two colours really compliment each other and make the photo really pop.

Here is the finished layout.

So.. why not pop over to the shop and check out all the yummy new products that are on offer.

Happy Scrapping, M x

Wednesday, August 22, 2012

Mixing it up with a masculine theme

Hello everyone.

Back again to share with you a card I created just recently using some fun products from


I had a chance to be able to create a masculine card last week for a very special friend. Now masculine cards had be a bit of a hard one at the best of times. I wanted to create a card that was too frilly or sparkly.

So I sent to work with these products from The Robin's Nest


and got creative.

By using a piece of recycled card as the base it help to add to the grungy masculine look I was trying to creative. Then by just layering and inking I was able to make the card look a lot more masculine look.

By adding some old rub ons layered over the base of the paper parts of the card I could add what I wanted to say to the card and create a bit of depth at the same time.

Finally to add that last bit of dimension to the card I added my all time favourite embellishment, Fairy Dust Dew Drops. Not a card or layout goes with some of these on them these days. They are so much fun to add and look so good.

So why not grab some goodies from The Robin's Nest shop and have a play.

Get creative.

TFL, M x

Saturday, July 21, 2012

Looking for challenge

Have been playing around with some products from The Robin's Nest Design Team kit. I though this month's page map challenge looked like a bit of a challenge.

Here's the details about The Robin’s Nest Page Map Challenge:
The Page Map Challenge is a monthly challenge starting on the first Friday of month and will last for one month. The winner of the past month will be announced on that first Friday here on The Robins Nest Blog. All winners will be notified by email.

Entering into the contest you are giving The Robin’s Nest the right to use your project to promote the challenge on their blog and other Social Media sites.

Create your own layout using the current Page Map – the Page Map can be incorporated vertical or horizontal in the layout.

The Robin’s Nest Papers or embellishments must be used in the layout.

HOW TO ENTER:
Add your layout to the inlinkz tool. If you have a blog grab our button and add it to your blog post.

A blog is not a requirement for this Challenge, you can use FlickR or any other Social Media Site to enter.

The winner will receive a $25 Gift Certificate to The Robin’s Nest On-Line Store!

So.. here's the page map for this month created by The Robin's Nest's own Michelle Frae Cummings

Here's my take on the sketch. Found it a bit of a challenge myself as I don't normally use more than two photos on a layout. However.. as I am always up for a challenge it was lots of fun to create this layout.


I used some of The Robin's Nest papers and dew drops to create my flowers. The dew drops I think look really good as the centre of the flowers and add great dimension quite easily.

With a little bit of help from a cardboard texture paste, paint and glimmer mist the background was created quite quickly and game a great dimensional effect.

So why not pull out some papers and have a play with this months challenge.

Get scrapping.

TFL, M x

Making a mess and getting creative with The Robin's Nest and Helmar

This week, the Helmar Design Team have been having a blast playing around with some fun products from

I must say.. that until recently I knew very little about The Robin's Nest and what products they have.
Well.... I have been majorly missing out that's all I can say.

Since I have received some of their products from Helmar and am now part of The Robin's Nest Design Team, I have had a chance to really play around with some amazing products.

As I said in my first post for The Robin's Nest I have ABSOLUTELY fallen in love with their dewdrops.

I think I have used them on every card and layout I have made in the last week. They are so versatile and add the extra pop to cards and layouts alike. I know that I am eager to pop over to the shop and stock up as they are so much fun to play with.

Plus to add to the added bonus I am now in love with their papers. I have been covered in glitter for the last week playing around with their paper ranges. I have never really been a huge glittered paper fan. That was until I received some of The Robin's Nest papers to play with. I have found the quality to be really good and the thickness of them perfect for playing around with and making a huge mess.

And yes... as most of you know I do like to mix it up a bit and play around with my papers.
So.. I got to work when I received my supplies to create this layout.

The base of the layout was created using old book pages adhered using my trusted Helmar Acid Free Glue wash to a piece of pasteboard cut to size and then lightly misted with gesso spray to mute it down. I then spread the centre of the layout with a layer of texture paste roughly and added a colour wash when the texture paste was dry.

The hearts were then created by book page adhered to light card stock using Helmar Acid Free Glue wash, and the others are hand cut from The Robin's Nest paper that I had chosen to work with because of the thickness of The Robin's Nest paper it was perfect for creating embellishments from. I was able to hand stitch them onto the card stock base quite nicely and fold the edges upwards and they help their shape.

I was then able to add that extra little bit of pop to the layout by adding The Robin' Nest dew drops to the smaller black hearts and randomly adhered them using Helmar Gemstone Glue over the base of the layout. I used the clear dew drops, which meant they were able to pick up the colours from the base of the layout nicely.

So super easy to create such a simple layout using some great products from Helmar and The Robin's Nest.

Off to play some more with my Robin's Nest products.

Happy Scrapping.

TFL M x


Tuesday, July 17, 2012

SUPER SUPER EXCITED !!!!!!!!!

Hello everyone....

Super excited today as it is my first post for

I was lucky enough to be chosen to be on the design team.

I must say that when my design team box arrived in my mail I really didn't know where to start. I didn't want to cut up any of the paper and WOW where have the dew drops been all my life.


I think I have used them on every layout I have created so far since my design team box arrived. They are so cool and fun to play around with.

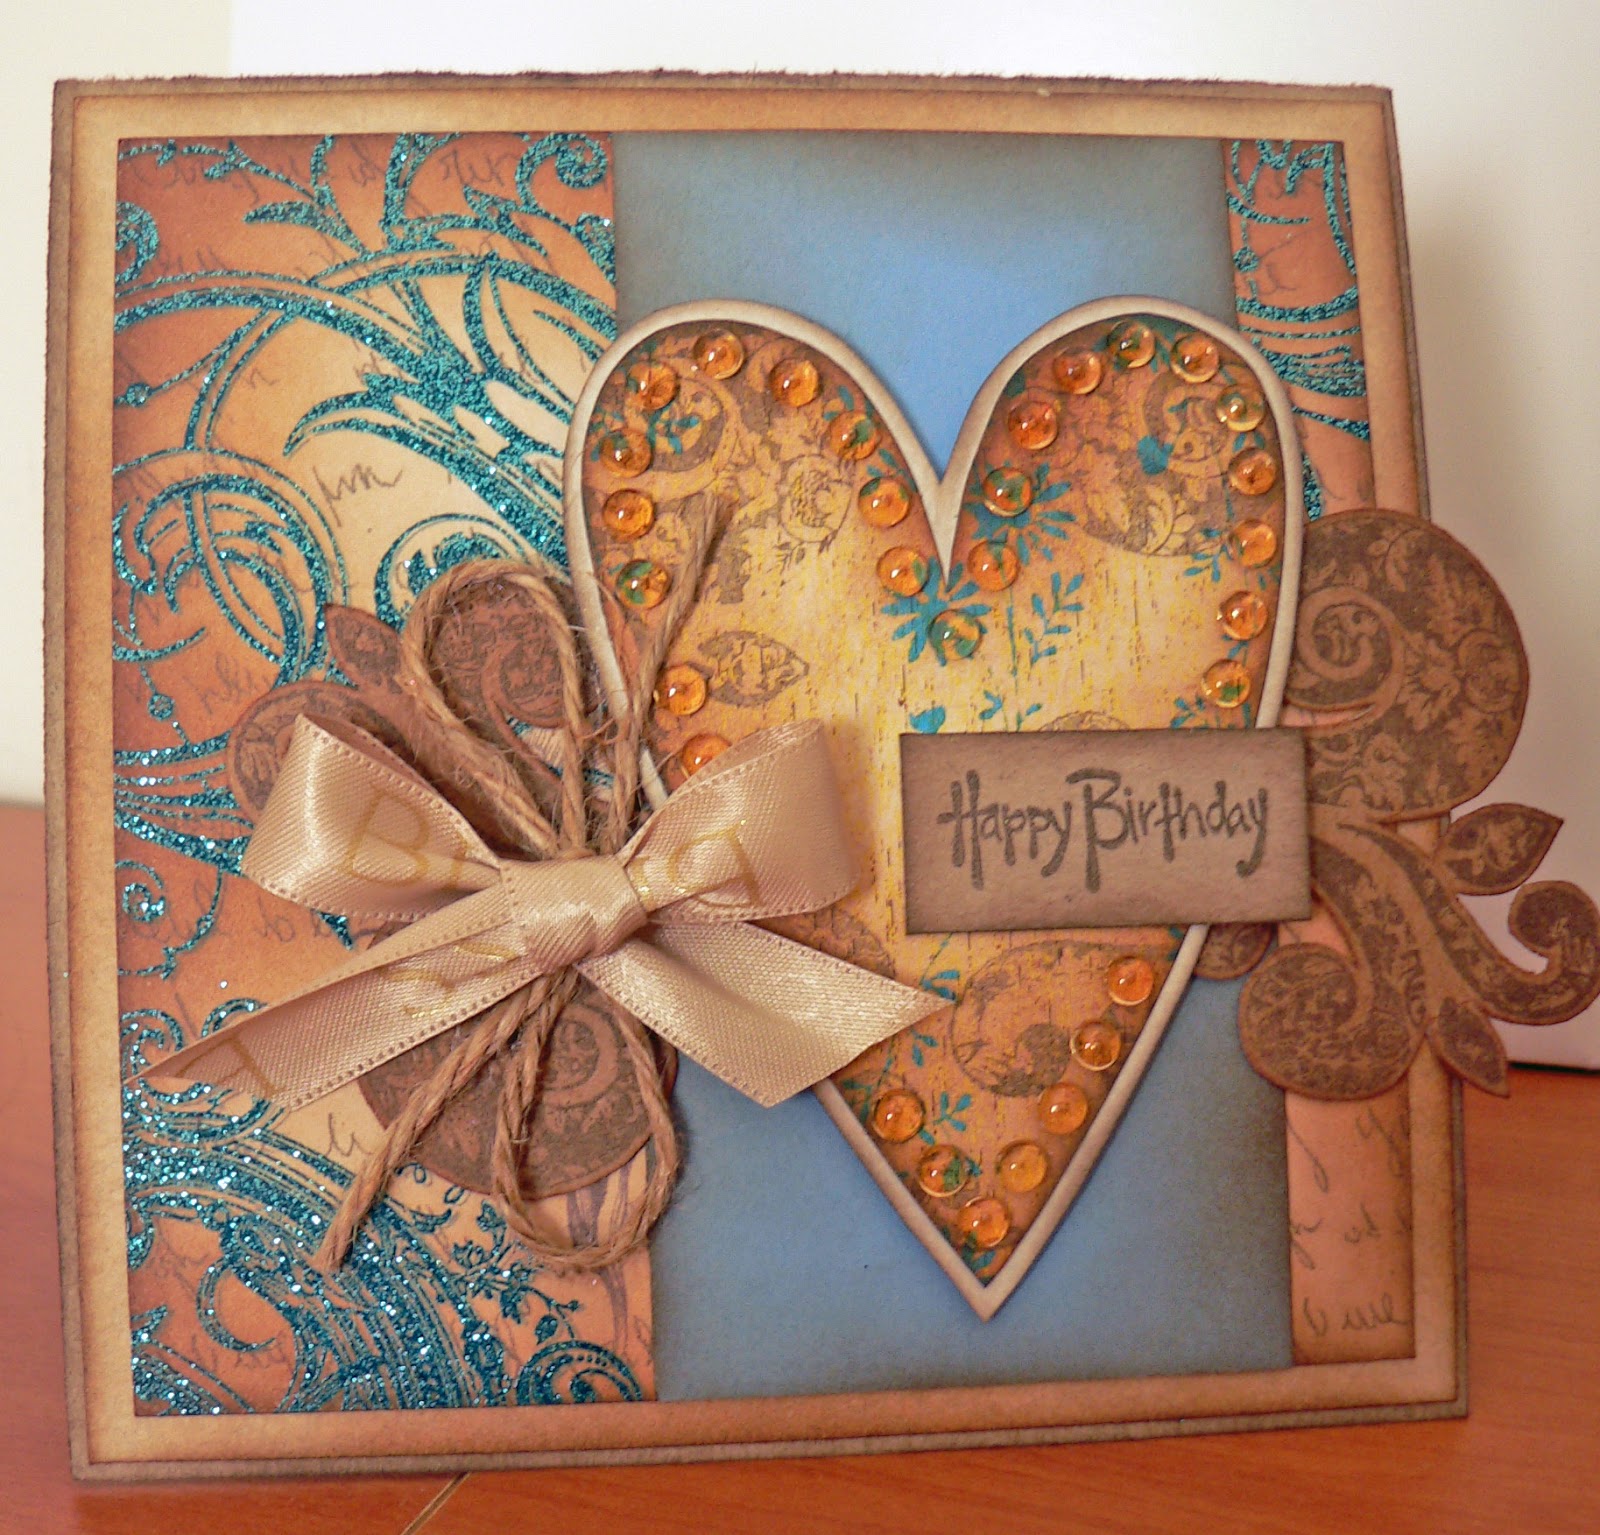
So.. when I finally pulled myself together I managed to cut up some of my goodies up this is what I ended up playing around with.


So with a little help from the about I was able to make a major mess and get completely cover in glitter!

I started by recycling a piece of packaging to create the base of my layout. Then I adhered layers of book pages to start with using Helmar Acid Free Glue watered down. Once that had dried I then lightly sprayed it randomly with gesso and a few different colours of glimmer mist in different spots. Finally to finish the base off stamped the whole think with script stamp randomly and then added some butterflies a bit more heavily.

Once all that was done I was able to add in my Robin's Nest Glittered Papers which i had inked the edges of to give a bit of dimension.
Then came the process of layering my Robins's Nest Viva Rubons, Paris Clip Ons and some flowers that I had almost misted lightly with gesso

The main part of the title was also created adhering a scrap of the paper to thick chipboard then stamping directly onto the reverse side of the the Robin's Nest Glittered Patterend Paper and cutting them out by hand. to finish off the layout I randomly adhered some dew drops around the clustered embellishments. They really popped too with the glimmer mist behind them and added a really nice finish.

So here's the full layout..

And don't die of shock... YES is actually a layout with a photo of me in it. Very few and far between I know.. but these paper really inspired me.

Better get back to scrapping. There is so many other goodies in my design team box I want to play with.

TFL, M x